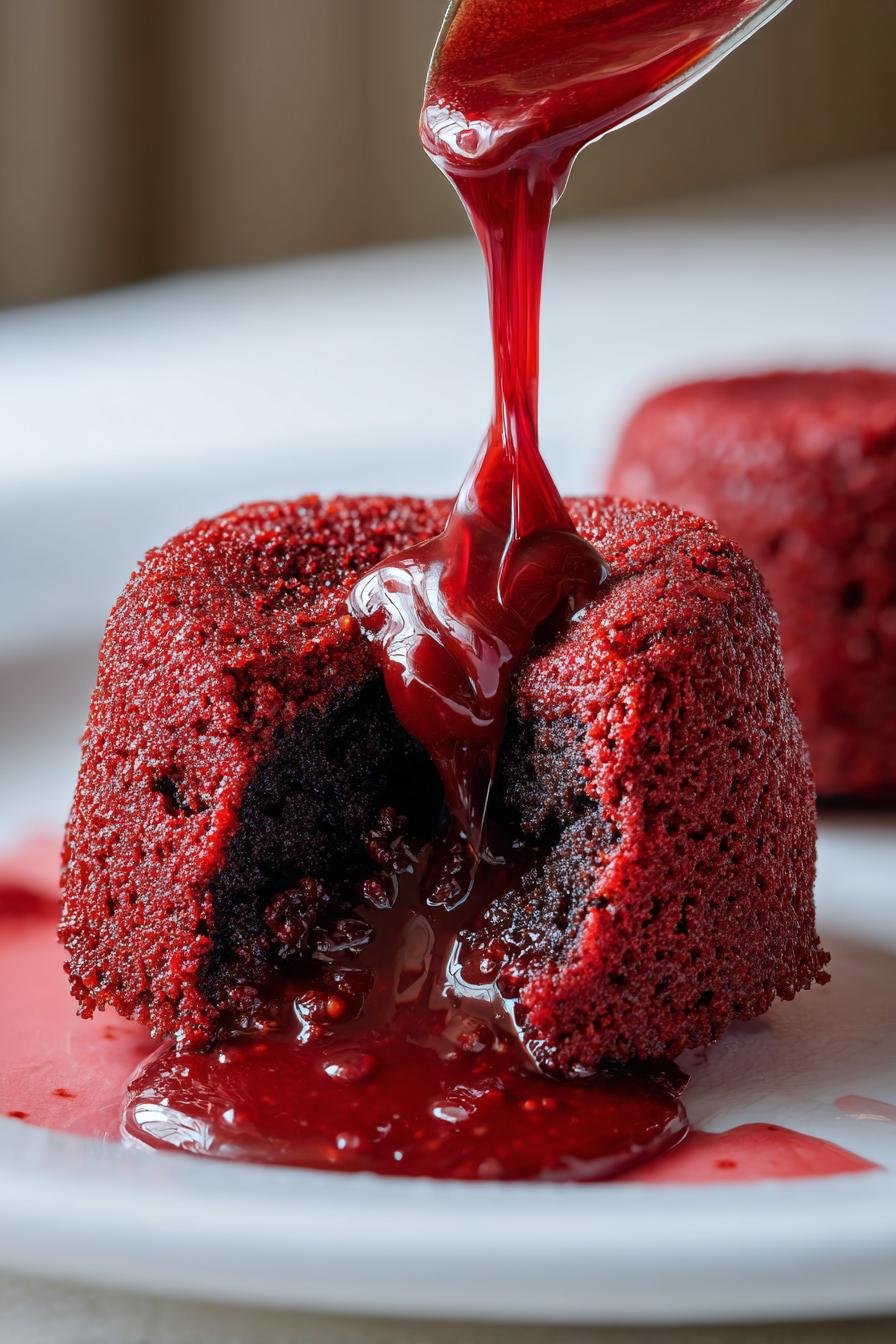
Oreo Stuffed Red Velvet Lava Cakes that Melt in Your Mouth!
Introduction to Oreo Stuffed Red Velvet Lava Cakes
As a busy mom, I know how precious time can be, especially when it comes to whipping up something special in the kitchen. That’s why I absolutely adore these Oreo Stuffed Red Velvet Lava Cakes! They’re not just a treat; they’re a delightful experience that melts in your mouth. Imagine the joy on your loved ones’ faces when they dig into these warm, gooey cakes, revealing a hidden Oreo surprise. Perfect for a quick dessert after dinner or a sweet indulgence on a hectic day, these lava cakes are sure to impress without the fuss!
Why You’ll Love This Oreo Stuffed Red Velvet Lava Cakes
These Oreo Stuffed Red Velvet Lava Cakes are a dream come true for busy moms and professionals alike. They come together in just 30 minutes, making them a quick and easy dessert option. The rich, velvety texture combined with the creamy Oreo center creates a taste sensation that’s hard to resist. Plus, they’re perfect for impressing guests or simply treating yourself after a long day. Who doesn’t love a little indulgence?
Ingredients for Oreo Stuffed Red Velvet Lava Cakes
Gathering the right ingredients is the first step to creating these delightful Oreo Stuffed Red Velvet Lava Cakes. Here’s what you’ll need:
- All-purpose flour: This is the base of your cakes, giving them structure and a soft texture.
- Unsweetened cocoa powder: It adds a rich chocolate flavor, balancing the sweetness of the cake.
- Granulated sugar: Sweetness is key! It helps create that melt-in-your-mouth experience.
- Unsalted butter: Melted butter adds moisture and richness to the batter.
- Large eggs: Eggs provide binding and help the cakes rise, creating that perfect lava effect.
- Buttermilk: This ingredient keeps the cakes tender and adds a slight tanginess.
- Red food coloring: It gives the cakes their signature vibrant red hue, making them visually stunning.
- Vanilla extract: A splash of vanilla enhances the overall flavor, making it more aromatic.
- Baking powder: This leavening agent helps the cakes rise and become fluffy.
- Salt: Just a pinch enhances the flavors and balances the sweetness.
- Oreo cookies: The star of the show! These cookies provide a creamy, chocolatey surprise in the center.
For those looking to switch things up, consider using dark cocoa powder for a deeper flavor or even gluten-free flour for a gluten-free version. You can find all the exact measurements at the bottom of the article, ready for printing!
How to Make Oreo Stuffed Red Velvet Lava Cakes
Step 1: Preheat and Prepare
First things first, preheat your oven to 350°F (175°C). This step is crucial for achieving that perfect lava cake texture. While the oven warms up, grab a muffin tin and grease it well. I like to use a non-stick spray or a little melted butter to ensure the cakes slide out easily. Trust me, you don’t want to lose any of that gooey goodness!
Step 2: Mix Dry Ingredients
In a large mixing bowl, combine the all-purpose flour, unsweetened cocoa powder, granulated sugar, baking powder, and salt. Whisk them together until they’re well blended. This step is important because it ensures that the baking powder is evenly distributed, helping your cakes rise beautifully. The rich cocoa powder will give your lava cakes that deep, chocolatey flavor we all love!
Step 3: Combine Wet Ingredients
In another bowl, whisk together the melted butter, large eggs, buttermilk, red food coloring, and vanilla extract. Make sure the butter isn’t too hot, or it might cook the eggs! This mixture should be smooth and vibrant, with that lovely red hue shining through. The buttermilk adds a nice tang, balancing the sweetness of the sugar and cocoa.
Step 4: Combine Mixtures
Now, it’s time to bring the wet and dry ingredients together. Pour the wet mixture into the bowl with the dry ingredients. Gently mix until just combined; don’t overdo it! A few lumps are perfectly fine. Overmixing can lead to tough cakes, and we want them soft and gooey. This is where the magic begins!
Step 5: Assemble the Cakes
Take your greased muffin tin and pour a small amount of batter into each cup, just enough to cover the bottom. Next, place an Oreo cookie in the center of each cup. Then, cover the cookies with more batter until they’re fully hidden. This is where the surprise comes in! The cookies will melt into a creamy center, creating that irresistible lava effect.
Step 6: Bake
Pop the muffin tin into your preheated oven and bake for 12-15 minutes. Keep an eye on them! You want the edges to be set while the center remains soft and gooey. A toothpick inserted into the edges should come out clean, but the center should still be a bit wobbly. This is the secret to that luscious lava!
Step 7: Cool and Serve
Once baked, let the cakes cool in the tin for about a minute. Then, carefully invert them onto a plate. They should slide out easily, revealing that beautiful lava center. Serve them warm, and don’t forget to enjoy the gooey goodness! A scoop of vanilla ice cream on the side makes it even more delightful.
Tips for Success
- Use room temperature ingredients for better mixing and texture.
- Don’t overbake! Keep an eye on the cakes to maintain that gooey center.
- For a fun twist, try adding a sprinkle of sea salt on top before serving.
- Let the cakes cool slightly before inverting to prevent breaking.
- Experiment with different cookie fillings for unique flavors!
Equipment Needed
- Muffin tin: A standard muffin tin works great, but you can also use silicone molds for easy removal.
- Mixing bowls: Use two medium-sized bowls for mixing wet and dry ingredients.
- Whisk: A whisk is perfect for blending ingredients, but a fork will do in a pinch.
- Measuring cups and spoons: Essential for accurate ingredient measurements.
- Spatula: A rubber spatula helps in folding and scraping the batter.
Variations
- For a chocolate overload, try adding chocolate chips to the batter for extra gooeyness.
- Swap out the Oreo cookies for peanut butter cups for a delicious twist on flavor.
- Make it gluten-free by using a 1:1 gluten-free flour blend instead of all-purpose flour.
- Add a hint of espresso powder to the batter for a mocha flavor that pairs beautifully with chocolate.
- For a fruity touch, mix in some raspberry or cherry preserves into the batter before baking.
Serving Suggestions
- Pair these lava cakes with a scoop of vanilla ice cream for a classic combination.
- Drizzle with chocolate or caramel sauce for an extra indulgent touch.
- Serve with fresh berries for a pop of color and freshness.
- Garnish with whipped cream and a sprinkle of crushed Oreos for added flair.
- Enjoy with a cup of coffee or a glass of milk to balance the sweetness.
FAQs about Oreo Stuffed Red Velvet Lava Cakes
Can I make these Oreo Stuffed Red Velvet Lava Cakes ahead of time?
Absolutely! You can prepare the batter in advance and store it in the fridge for up to 24 hours. Just remember to let it come to room temperature before baking. This way, you can whip them up quickly when you’re ready to indulge!
What if I don’t have buttermilk?
No worries! You can easily make a substitute by mixing one cup of milk with one tablespoon of vinegar or lemon juice. Let it sit for about 5 minutes, and you’ll have a perfect buttermilk replacement for your lava cakes.
Can I use different cookies instead of Oreos?
Definitely! While Oreos are a classic choice, feel free to experiment with other cookies like chocolate chip or peanut butter cookies. Each will bring a unique flavor to your lava cakes!
How do I store leftover lava cakes?
If you have any leftovers (which is rare!), store them in an airtight container in the fridge for up to 2 days. Reheat them in the microwave for a few seconds to enjoy that gooey center again!
Can I freeze these lava cakes?
Yes, you can freeze them! Just make sure they are completely cooled before wrapping them tightly in plastic wrap and placing them in a freezer-safe bag. They can last up to 2 months in the freezer. When you’re ready to enjoy, thaw them in the fridge and reheat as needed.
Final Thoughts
Creating these Oreo Stuffed Red Velvet Lava Cakes is more than just baking; it’s about sharing joy and deliciousness with those you love. The moment you cut into one and watch that gooey center flow out is pure magic. It’s a simple yet impressive dessert that can turn an ordinary day into something special. Whether it’s a family gathering or a quiet night in, these lava cakes bring smiles and warmth. So, roll up your sleeves, embrace the mess, and enjoy the sweet rewards of your culinary adventure. Trust me, your taste buds will thank you!
Print
Oreo Stuffed Red Velvet Lava Cakes that Melt in Your Mouth!
- Prep Time: 15 minutes
- Cook Time: 15 minutes
- Total Time: 30 minutes
- Yield: 6 servings 1x
- Category: Dessert
- Method: Baking
- Cuisine: American
- Diet: Vegetarian
Description
Delicious red velvet lava cakes filled with creamy Oreo goodness that melt in your mouth.
Ingredients
- 1 cup all-purpose flour
- 1/2 cup unsweetened cocoa powder
- 1 cup granulated sugar
- 1/2 cup unsalted butter, melted
- 2 large eggs
- 1/2 cup buttermilk
- 1 tablespoon red food coloring
- 1 teaspoon vanilla extract
- 1/2 teaspoon baking powder
- 1/4 teaspoon salt
- 6 Oreo cookies
Instructions
- Preheat the oven to 350°F (175°C) and grease a muffin tin.
- In a bowl, mix together the flour, cocoa powder, sugar, baking powder, and salt.
- In another bowl, whisk together the melted butter, eggs, buttermilk, food coloring, and vanilla extract.
- Combine the wet and dry ingredients until just mixed.
- Pour a small amount of batter into each muffin cup, then place an Oreo cookie in the center, and cover with more batter.
- Bake for 12-15 minutes until the edges are set but the center is still soft.
- Let cool for a minute before inverting onto a plate.
- Serve warm and enjoy the gooey center!
Notes
- For a richer flavor, use dark cocoa powder.
- Make sure not to overbake to keep the lava center.
- Serve with vanilla ice cream for an extra treat.
Nutrition
- Serving Size: 1 cake
- Calories: 350
- Sugar: 25g
- Sodium: 200mg
- Fat: 18g
- Saturated Fat: 10g
- Unsaturated Fat: 6g
- Trans Fat: 0g
- Carbohydrates: 40g
- Fiber: 2g
- Protein: 4g
- Cholesterol: 80mg